twitter pinterest personal instagram house instagram bloglovin
fancy like that.
  • Home
  • About
  • Contact
  • Categories
    • Interiors
    • Book Reviews
    • Etc.
    • Chronic Fatigue


Nowhere I'd rather spend a rainy #Sunday morning ☔️ (although if anyone wants to fly me straight back to sunny Corfu I'm in) #sssleep #sundaymorning #bedroom #bedroomdecor #whiteroom #fralexhaveahouse
A post shared by Frances (@frances.turpin) on Jul 23, 2017 at 12:56am PDT


I threatened a series of interior inspiration posts and I'm following through.

Today I'm feeling particularly sleepy (even more so than usual), so it's bedroom inspo time. This is a room which is *almost* - but not quite - done... I'm still tweaking things in there, so it doesn't feel ready for a full reveal on here yet. But here's a little taster, courtesy of Instagram:

...And in all honesty, it doesn't still look exactly like that at the moment.

So while I'm still trying to figure out what needs to be where etc., I thought a little moodboard would be helpful to me (and maybe interesting to you?). All pictures are, of course, straight from my bedroom board on Pinterest.


As someone who often struggles to maintain a normal sleep pattern (though I'm getting better at it), I've spent a lot of time reading about 'sleep hygiene,' aka "habits and practices that are conducive to sleeping well on a regular basis" (thanks, Google!) and it is commonly agreed that the bed is for sleep and sex only. That means not only not taking phones, tablets etc. to bed with you, but also not using the bed as a place to do things like write blogs, paint your nails, check your work emails, whatever - anything vaguely stimulating (er, sex aside, one would hope...) should be done elsewhere, according to experts, so that your brain doesn't connect the bed to anything other than the sweet, sweet embrace of slumber.


And as we're two people (who share a bedroom) living in a three-bed house, it made sense to me to take this concept even further and banish all non-sleep activities which are usually bedroom based, including getting dressed, to other places. The idea is to create a gorgeously calm, cosy space where we can read and sleep without having any of the frantic energy of getting ready in the morning hanging around: Sunday Morning in room form. Also, this way I could justify having a dressing room...


Bedroom reading corner 📚 #bedroomdecor #bedroom #whiteroom #houseblogger #interiors #fralexhaveahouse
A post shared by Frances (@frances.turpin) on Aug 3, 2017 at 11:48pm PDT

My extensive research has taught me that, in order to get the Scandi-boho bedroom of my dreams (ha), I'll need the following elements:


White walls


Scroll through my Pinterest board - or, tbh, Pinterest in general - and you'll see a glowing expanse of designer white walls:


As I've already said on here, I'm particularly picky when it comes to white paint, but I did want to go for it in the bedroom to really get that glowy, airy look, as modelled perfectly here: 

Minimalist bedroom inspiration: gallery wall
Source


Source

As per usual, we turned to Valspar - specifically, the cosily named Shetland Sweater:

Pick a bedroom wall colour that sounds like something you'd want to wrap yourself up in and nap forever 😴 #fralexhaveahouse #bedroom #valspar #shetlandsweater #iwanttonamepaintcolors
A post shared by Frances (@frances.turpin) on Jun 5, 2017 at 12:18am PDT

In some lights it looks like a very very pale grey, and in others it's snowy white - but, most importantly, it is a warm white without having any yellow tones - not today, magnolia!

Plants (and lots of them)

Honestly, I'll happily have a small rain forest in each and every one of our rooms. But green leaves look especially good against white walls - and there are certain plants that can actually benefit you while you slumber, so that's a bonus. At the moment we only have an aloe vera (good for purifying the air, and also useful in a tight spot if you - like my freckly ginger boyfriend - are prone to sunburn) and a ficus (because I already had one), but I have a whole list of other plants I'm planning to put in there which will basically turn us into superhumans overnight.

Inspiration for my bedtime jungle comes from:


267 Likes, 25 Comments - 75 m2 White Boho Living (@lovedbysheila) on Instagram: “Rainy and cloudy day here in 🇳🇱. But at least that means it's candle time 😊. Do you love candle…”
Source
White rocks at the base of plants
Source


Source
✧ pinterest: lx_xa ✧☽ ☼
Source


Next up,

Crumpled bed linen

It's very Tumblr of me, I know, but I'm obsessed with those images of rumpled white bedding, sun streaming onto them, with a plate of croissants and a small bathtub of coffee placed just so on them. Basically, almost anything on the #sssleep hashtag on Instagram. There are a ton of options if you want to buy yourself a little slice of weekend to sleep under all week (just Google 'washed linen bedding'), but I can personally recommend this set from Muji, which we had on our old bed at the flat - and, as we upgraded to a kingsize in the new house (best money we ever spent, easily), this set from Made.com. Both are super soft whilst staying crisp and cool - which is important to me, as I often overheat when I'm sleeping.

Not sold yet on on-purpose un-made beds? But look:

Source
Source
Source

I'm getting super ready for a nap now, so I think there's only one more category left -


Gauzy curtains

The window dressing in the bedroom is the polar opposite of that in the living room - whereas downstairs we have a sheer blind with thick opaque curtains, in the bedroom we have these blackout blinds for nighttime, and sheer, flowy white curtains on top, which distill sunlight around the room in a truly lovely way whilst also prevent the across-the-road neighbours from being able to peep in.


http://shinysquirrel.typepad.com/shiny_squirrel_/
Source
Source


Minimalist bedroom inspiration: bright and airy
Source
And on that dreamy note, I shall bid you so long, farewell, auf wiedersehen, good night...

Sweet dreams!
Share
Tweet
Pin
Share
No comments
Follow my blog with Bloglovin


I'm having a bit of a thing with pink right now. If you follow me on Instagram you may have seen in my stories this week that we've just had our hall decorated, including a pink front door and cupboard that I am a little bit obsessed with. You may also have seen glimpses of my dressing room, which is done out in Pantone's Petal Pink. 

It could be the influence of hashtag Millennial Pink, of course. Or this Kate Spade ad from a couple of years ago. Or the huge flamingo trend of the last two years or so, which I have been more than swept up in (to date I have: 2 x cushions with flamingos on, flamingo fairy lights, flamingo Christmas baubles, a gold statue of a flamingo, flamingo wallpaper, a flamingo hook, several flamingo notebooks, a flamingo scarf...) 

Whatever it is or was, pink and I are most definitely in the middle of our honeymoon phase right now. Not all shades give me the same thrill of joy - it pays to be a little picky, darling - but petal pinks, coral pinks, hot pinks, blue pinks... I could go on. They are all fun and fabulous and I am Here. For. Them.


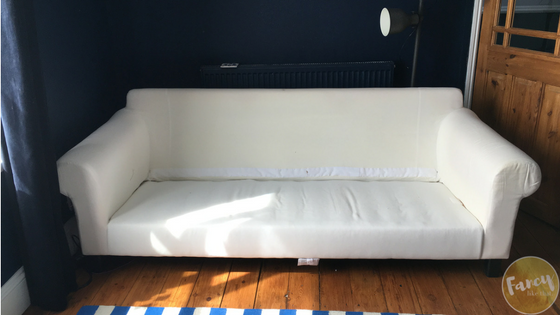
Which means that my house is Here. For. Them., too. Most recently here for pink? Our slightly worn-out looking good old IKEA Ektorp three-seat sofa:

Ah, the Ektorp. An IKEA staple, in league with the Poäng chair and that green stuffed snake everyone and their mother had back in the day. You know the one I mean. This one came courtesy of Alex's dad, who kindly gifted us a slew of furniture from his old house, and was in fine shape - it just felt a bit tired. NOW, however... 


Well, it's certainly not tired any more!

Yep, I dyed the sofa pink. A fairly bright pink, too, although I have to say it looked a lot, lot brighter when it was first dyed - think if a highlighter and a neon sign had a baby. In situ in the living room, with the cushions and the lovely blue walls, it actually fits in pretty well.

Want to know how I brought this monstrosity to life? Read on...

Failures First
Oh, you thought that the above is the result of my first attempt at this? Hahahaha NO. I originally tried to dye the browny-beige covers that we already had, thinking that they were light enough to take the colour. The result? A pinkish (heavy on the ish, light on the pink) brownish-beige set of sofa covers. After a little digging through the interwebs, I realised that:
  1. Not all sofa covers are created equally! Our original covers were probably these ones, which are a mix of polyester and other things, which the dye we used (Dylon machine pods) can't actually stick to. The ones above are these covers, which are 100% cotton
  2. READING THE INSTRUCTIONS - P R O P E R L Y - HELPS.
    Not only would this have helped me with the cover issue, but I also would have realised that the original amount of dye I bought was way, way less than I needed
Getting Your Dye Right
As I said, we used Dylon machine dye pod things for this project, mainly because I don't really know of any other fabric dye options in the UK - they seem to have the monopoly!

This colour is is called Peony Pink, chosen partially because it was the lighter of the two pinks they had on offer, and partially because the whole reason I decided that the sofa would be pinkified was because of this photo:

I mean, when there are peonies on sale for £3.50 it would be rude not to 🌸🌸🌸 #peonies #peony #livingroom #vignette #shelfie #bookcase
A post shared by Frances (@frances.turpin) on Jul 10, 2017 at 12:54pm PDT

I've always enjoyed certain shades of navy and pink together - as my Mum would say, it looks 'very French' - and I'd been planning to do something with the sofa for a while, but I wasn't sure exactly what. Having more dark blue in the room felt like it would be an error, and I toyed with doing a rich green (I dream of emerald velvet chaises...), but when I saw how much just having a bunch of bright flowers in the corner did for the room I decided that it didn't need any more dark/jewel tones - it needed pinkness.


Now, I'm no horticulturalist but I'm fairly sure that the shade we ended up with isn't one naturally found in the peonies of the world, which is fine because I still think it looks pretty fab.


Once you've picked your shade, you need to Do The Maths, which I did not enjoy.


Basically, one pod will do 600g of fabric to full colour, 1.2kg to a paler version. This is important and useful information to know. And an important and useful tip to go along? Don't try to guess how much something weighs! The instructions say that 1.2kg of fabric is about the same as a double duvet cover, so we decided that the main cover for the body of the sofa was about the same as that, and all six cushion covers were too, so we bought four pods of dye (two for the cushions, two for the rest). THIS WAS COMPLETELY AND TOTALLY WRONG.


The entire lot - cushion covers and carcass cover combined - is about 5½-6kg. So no wonder that, when I tried to dye maybe 3kg of cushion covers with 1.2kg worth of dye, nothing really happened, regardless of the fact that the material was wrong.


On our second go round, having bought the new white cotton covers (we decided this was the safest bet to make sure it actually worked this time), we played it super safe and ordered no fewer than twelve pods of dye. SIDENOTE: this is not a cheap DIY (though it is cheaper than buying a new sofa!), so enter at your own risk!


Oh also, when you use multiple pods of dye, you're meant to empty them directly into the washing machine, not just put them all in together as if it was one pod. The more you know, eh?


We ended up doing the dyeing in three goes: 2 x three cushion covers, and the carcass cover, with three pods' worth of dye per load (this is maybe why the cushions are slightly brighter than the rest of the cover - we maybe should have done an extra one for that). I won't bore you with the details of how you use the dye because the instructions come with it, but it's super simple once you actually, you know, read and follow them instead of blundering blindly ahead with nothing but hopes and dreams and completely unfounded confidence in your own ability.


Let's Talk About Legs, Baby
You're a smart person, so you've probably noticed that changing the colour isn't all I did to the sofa. I also got its ankles out, like some sort of Victorian pervert.

I have a real thing about furniture that sits fully on the floor, and I don't know why. Not to get too airy fairy on you, but it just feels wrong, energy-wise, to me - as if something is being blocked (this may be the result of me getting a little bit obsessed with an old 80's Feng Shui book of my Mum's I found when I was about 10, which magically disappeared one day after I insisted we hung windchimes in every corner of the house and which my family deny all knowledge of to this day). Plus I just don't like how it looks; all I can think of - especially with sofas and beds where it's material that's hanging onto the floor - is the city of dust, pennies and lost biros collecting under there. Ugh.


So, I decided that the Ektorp needed to lose its skirt and bare its pegs.


Only... well, not to body-shame, but it did not have pretty legs.


See those big, blocky black plastic things? Not my cup of tea, I'm afraid!


Lucky for me, I'd found these little beauties in my favourite section of IKEA, bargain corner (later to be the scene of our epic showdown over the footstool) for only £7 months ago and was saving them just for this makeover:


There were a ton of them at the time and I'm a little bit annoyed that I didn't pick up another pack so that we could have had matching legs on both sofas in there, but c'est la vie - they're all gone now!


Changing the legs was pretty easy - I just tipped the sofa onto it's back, and - once I had confirmed that I need a screwdriver to remove the old legs (tip: if you didn't put the legs on in the first place, try and check with whoever did what the process was rather than try unsuccesfully for ten minutes to spin a screwed-on leg off your sofa) - got them off in a jiffy:


As you can see, I'd already put the base cover on (yeah, let's see how many different terms I can come up with for whatever that piece of material is in one post).


And... this is where it gets tricky. Ish.


Tucking the excess cover underneath the sofa - so that the legs would be on display - wasn't difficult exactly, but it was a bit fiddly. I'll do my best to explain my methods to you:


I decided that, rather than try to get the fabric to go around the legs at the corners, I needed to put the legs on over the cover - this would also be extra security to keep the cover attached to the base, rather than drooping to the floor.


Above is one of the corners - you can see that it's pleated, because of the way it's designed to hang. Folding that much fabric up looked a bit bulky, and it was difficult to get the leg to attach over the top, so on each corner I cut out the central triangle in the pleat:


Once I'd done this, I put the screw from the original legs back in so that I knew where the holes for the new legs needed to be, and cut a slit in the fabric:


I then attached the fabric to the base of the sofa using my new favourite toy, the staple gun!


Then, I repeated the same steps with the other corner of fabric. I ended up cutting a square off the bottom of each remaining triangle in the pleat (in the box, below) too, again to avoid too much fabric bulking up:


Once I had everything tucked and stapled, I screwed the new leg on through the holes in the cover


After doing this on all four corners, I stapled the rest of the lose cover to the edges of the base:


Two rows on each edge - one directly into the wooden base of the sofa (the one closest to edge), and the second for neatness, to keep the edges from flapping.


Tipped it back the right way up, et voilà! One bright pink, slightly mid-century looking brand-spanking new sofa.


I am delighted with how this DIY/IKEA hack/makeover/whatever you want to call it turned out. Over the MOON. You know how sometimes you have a very clear idea in your head of how something will look, then you do it and it turns out to be a complete mess and nothing like what you imagined? Well, after my first attempt I thought this would be one of those times - but actually, it's pretty much exactly how I envisioned it. I'm so pleased with it!


Even Brokk's impressed! Ish
Have you ever tried a slightly too ambitious project that's turned out OK? Or, are you planning to embark on something outside of your usual comfort zone? What's your favourite IKEA hack? I have a feeling you'll be seeing quite a few on here in the upcoming months...
Share
Tweet
Pin
Share
No comments
Hello there, my lovelies.

I'm not going to lie - I starting drafting this post about a month ago, possibly even more. I'm pretty sure there's never a good time to come down with an unknown exhaustive condition (yup, still no diagnosis! But I've had enough blood taken to feed at least one small vampire family, so hopefully I'll have answers soon once all the tests come back...) but I can vouch for the fact that being knocked pretty much unable to do anything more than sleep, watch Wives With Knives (the new Snapped: Women Who Kill, you heard it here first), sleep, try to decide if eating will make randomly feel carsick and then sleep some more when you've just moved into your first house and you had Big Plans to decorate and write about that decorating is really bloody inconvenient. Wow, that was a long sentence. 


Anyway, this post isn't a personal pity party, it's a personal showing-off party, where I'm going to shove what may be my favourite room in the house at the moment (tied with our bedroom, I think...) all up in your grill. Ladies and gentlemen, I give you... The Living Room:


Da-da-da-daaaa!
I LOVE IT.

This is a room designed pretty much entirely for a rainy November Sunday afternoon, around 3 PM, when the best thing you can possibly imagine doing is making a gigantic mug of tea/hot chocolate and curling up on the sofa with whatever semi-crappy Sunday afternoon film Channel 5 is playing, ideally The Mummy*

I love Sunday afternoons like this. Not every week necessarily, but Sundays for me are the ultimate recharge day. My ideal ones would probably include very little outside world contact and a lot of me-time.

But back to the living room. Aside from the above-described scenario, the biggest inspiration for this room was the fact it came with a wood burner, AKA the reason Alex wanted to buy the house. What screams (in a very gentle, comforting voice) 'cozy' more than a crackling fire and the perfect nap-inducing heat it provides? With that as my baseline, I threw my mind back to my brief obsession with Cruel Intentions - or, more specifically, Katherine's bedroom in Cruel Intentions (sidenote: the 90's/00's trend of adapting classics into teen films was a cinematic golden age and I need more angsty star-crossed teen tropes in my life.) A deep, dark blue room - when not occupied by a scheming semi-sociopathic cokehead version of Blair Waldorf - would be warm and nap-inducing AF, I decided.

Katherine's room in Cruel Intentions. Source

Obviously, Pinterest has helped with this fantasy, because deeply blue-black rooms are pretty 'in' right now, like all of my decor choices because I guess I'm just really basic. Here are some of the rooms I'm trying to channel:

Bathroom
Source

DSC03745
Source
Laurie Smith from Laurie Lee Leather's bookshelf 
Source
Dark, cosy living room painted in Farrow and Ball Stiffkey Blue with a gallery wall.:
Source

As well as the lovely deep, dark walls I think what all of these rooms have in common is a certain sort of Modern Victorian Eclectic vibe to the accesories and, especially, wall art, which is something I'm desperately trying to recreate in my own version.

Let's see a Before, shall we?


Pretty standard Victorian terrace fare: tall ceilings, big window, chimney breast, and - on three walls at least (why??) - the original moulding on the ceiling, which makes me incredibly happy. Oh, and wooden floors - AKA the reason I wanted to buy the house. We rented a floor sander a few weeks after we first moved in and had at the floors in here, the dining room and the bedroom (more on that in a future post! Probably! Let me know if you're at all interested!). I took this picture after we'd already done the floors (oops...), but before they were just a bit shinier and darker.


In retrospect, I kind of wish we'd painted the walls first, then sanded, then done the skirting board - only because having sanded and waxed the floors (with Ronseal Diamond floor wax) we were quite precious about them, and we've ended up spot-sanding and waxing any droplets of blue that have escaped the brushes (TIP: nail varnish remover also takes of accidental paint drips a treat without also taking up the finish underneath them). Not a big deal, but we could have saved ourselves a bit of time. Either way, we've ended up with lovely warm honey-coloured floor boards and I'm super happy with them. We went for wax over varnish because we wanted something that would show off the quality of the wood (the floor in here and the dining room were already exposed - as you can see - and in really good nick) and have a nice feel to it, and we definitely got that. 


Floor porn
The colour on the walls is Valspar's 'Night's Blue Arch', which not only has a fantastically dramatic name but is also gorgeous and a cheaper alternative to the Farrow & Ball 'Railings' that is the king of the deep blue drawing room. Pretty much every room in the house, save the kitchen, is getting painted in Valspar because they have a great range of colours and I enjoy their display in our local B&Q. I'm clearly susceptible to marketing. 

My only qualm with the paint was that in comparison to the other rooms we've done, the walls in here took f o r e v e r - but I'm pretty sure that that's just because darker paint needs that extra bit of time and attention. As you can see in the picture below, the first couple of coats went on pretty patchily, but the third was a dream and well worth the extra day's worth of scurrying up and down ladders and faningaling (technical term) around corners. 


Also, I spent a week picking blue out of various bodily crevices, so now I feel just that little bit closer to J-Law and her X Men experience. 


One of my favourite things about Valspar (not spon, but seriously hit me up I'm poor) is that you can get any shade in different finishes, so our shelving and cupboards in here can be a perfect match for the walls.

Which brings me nicely onto... the shelving.

Here's a before:


I don't mean to bad mouth the various previous owners in every post, because honestly they haven't done anything too insane (apart from wallpapering the bathroom, I stick by that rant!) - it's just largely not to my taste. Which is fine, because I'm sure whoever buys this house after we move, one day in the deep dark future, will want to burn down everything we've done and start again - that's the nature of owning a house. When it comes to the shelving option in the living room, the already existing built-in wasn't to my taste, or working for our purpose.

Here's the thing: I have a lot of books. I'm a prolific reader and, when it comes to books I love, a bit of a hoarder. I re-read - or plan to re-read - almost every book I've ever read, so I keep about 90% of the ones that come into my possession. Which means that when it comes to book storage, I need lots of it - and stat.

In our old flat, my book collection took up the majority of four little Billy bookcases which we had against the main wall in the living area, and since there was only so much we could do with the decor (i.e., we couldn't paint) I decided to go full Pinterest and organise them by colour so that they added some visual fun to our otherwise very bland white room. 


All of which is a long way to say, I ripped the old shelves out.


WITH MY BARE HANDS

OK, and a hammer. It was incredibly satisfying.

I even pried up the weird little bit of OSB board at the bottom... only to discover that some maniac had glued it on.


EIGHTEEN TIMES. EIGHTEEN blobs of glue. FOR OSB. THE LIGHTEST WOOD IN THE WORLD.

DID YOU RUN OUT OF NAILS? MY GOD!


Ok, so I guess I had one last anti-previous owners rant in me. But bloody hell. After spending several hours trying to pry the glue up (seriously, that stuff was not coming off - I tried brute force, glue dissolving fluid, nail varnish, animal sacrifices to the ancient gods - you name it!), you'd be pretty pissed off, too. 


In the end, we had to cover it up with another shelf, which works fine but is a tiny niggling annoyance to me because it just doesn't seem logical, to my brain, to add a base to shelves you've built on top of an exisiting unit, which is already serving as the base. 


Whew. 


After I had come to peace with Wood Glue Gate 2017, and finished painting the rest of the room, we got down to measuring for the new shelves.


TOP TIP: if your walls aren't straight (and chances are if they were built anytime before the 21st Century, they won't be), then you need to measure the width of the walls at the back and front of where your shelves will go.


Let me illustrate what I mean with some really high-tech graphics:


I mean, it may seem like common sense, but some people - naming no names here, but maybe us - might let that sort of logic slip their minds, and then have to re-cut all of the shelves.


I'm just trying to save you some pain.


During the whole shelf-building process, Alex declared that it was one the worst things I've ever made him do. And if that's true, all I have to say is...


Honestly? Worth it. The book cases look perfect. We measured them to make sure that, from the TV upwards, they're all at the same height so that it's almost perfectly symetrical on either side of the chimney breast. The TV fits snugly in the far corner (the cupboard on the right has a slightly bigger top, presumably designed to accomodate a television) and it doesn't feel like it's dominating the attention in the room without us having to do that ever so slightly pretentious (and, let's face it, inevitably mess-creating) thing of hiding it away behind cupboard doors or whatever. 


Come on, who's shutting those doors every damn night?


As you can see, I've stuck with my rainbow book theme. People always comment on it when they come in (usually positively) and it makes my slightly OCD and very visual mind incredibly happy to colour-coordinate. Also, despite the old adage I tend to at the very least remember books by their cover (if not judge them), so I actually find them easier to locate like this that trying to recall the author's surname or the title.


Some other details: the lampshade is IKEA, obviously, and the Treasure Island print was a gift from Alex a few Christmases ago. It fits right in with my literary wall, obviously, and at the moment it's the only piece of art on the walls in the living room because I haven't quite decided how the rest should be arranged yet.


We were really lucky that my manager was looking to get rid of this gorgoeus little 20's style leather Made.com sofa and it's armchair pal (currently in the sunroom) and got it for a song (thank you, C!)


The cushions (and pig) are a variety of presents and hand-me-downs, and the rug, footstool and side table are, of course, all IKEA. The side table and Eiffel Tower lamp (Next, I think, but a few years ago) were both originally bought for my bedroom at my parent's house and I sprayed them gold (of course) - the table in particular is good because it can be turned around and tucked under the sofa so that the top acts as a little table for laptops or dinners (although to be honest, we mainly use our knees. Still, choices are good!)


The footstool has a bit of a tale to it. We went to IKEA a few nights ago to get the rug (here - we could possibly have gone a little bigger, but I love that the graphic stripes add a bit of a fun twist, which is key as the wall colour could be a bit sombre otherwise. Also it's flatweave, which is good in a room where I regularly spill drinks and the dog will spend a fair amount of time) and spotted this little guy in Bargain Corner. We had been eyeing up his full-priced bretheran upstairs but didn't want to spend £55 on such a small piece at the moment, so we'd agreed to hold back and maybe buy something for the centre of the room in a couple of month's time.


And then. There he was, just chilling amongst the three-legged arm chairs and discontinued storage units. All grey and mid-century and almost perfect save for a few stains on the top. Oh, and the family (young couple and a toddler) also eyeing it up. 


"You could probably just power wash the top and it'd be alright," the IKEA employee told them


"Mmm, but are sure they'd come off?" the Mum and Dad wondered to each other, as if their progeny (who was cute, but inevitably sticky) wouldn't add stains the moment they got it home


"Alex. Keep watch," I whispered, from our station a few metres away. I could sense their weakness. The footstool would be mine. 


I pretended to be interested in a cabinet with a missing door and some chairs with torn cushions. Alex played idly with his phone. They continued to umm and ahh. And then, they wandered off.


We waited a few moments, of course, to be polite. We did a cursory turn of the aisle of unloved bookcases (all Billy) and rummaged half-heartedly in the bin of miscallaneous cushion covers. The family walked away. The stool was ours!


VICTORY. We paid £20, and got the stains off with a bit of Vanish (not a powerwasher) easily.


More IKEA finds - this industrial floor lamp provides lighting options and nods to both the modern and Victorian themes in the room


IKEA (also not spon, also please give me money I love you) had some velvet curtains in almost exactly the shade of our walls, which we paired with one of their sheer white blinds for privacy from the street while also letting maximum light in - a much nicer alternative to the vertical fabric blinds that were in every room when we moved in and which are the bane of my decorating life!

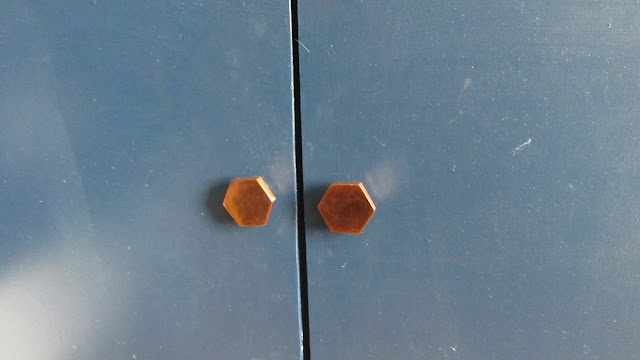
Can we please take a moment to appreciate my knobs? From Amazon
And there you are! One living room, mostly cooked. You may have noticed that you haven't seen the back wall, and that our seating options according to these pictures are not plentiful. Worry not, we have another sofa, I'm just doing a little project on it right now that I'm hoping to share with you very soon, and it isn't photo-ready at the moment.

Please, comment on this post, tell me what you like, what you'd like more of, link me to your rooms, give me some inspiration... just say hi! Whatever. And if you want to see more of the house, I'm much more prolific on Instagram, so click the links below and follow me there!


*(on the off chance C5 doesn't air The Mummy or one of its sequels, which are quite genuinely some of my favourite brain-off films, I do own the DVD boxset. #AlwaysBePrepared). 
Share
Tweet
Pin
Share
No comments
Newer Posts
Older Posts

About

IMG_7214

Hi! I'm Frances, I'm 25, I live in Cardiff, I read a lot, I love decorating my house, I have three guinea pigs and a dog who I will talk to you about for much longer than you anticipated when you asked me about them politely just to make small talk, and I wish I was internet cool - but I'm not.

Follow

  • twitter
  • IG - me
  • IG - house
  • bloglovin
  • pinterest
  • goodreads

Labels

  • bathroom
  • bedrooms
  • book review
  • dining room
  • DIY
  • etc.
  • interiors
  • kitchen
  • living room
  • m.e. myself and I
  • travel

Blog Archive

  • March 2018 (1)
  • February 2018 (3)
  • January 2018 (3)
  • August 2017 (3)
  • July 2017 (1)
  • June 2017 (1)
  • May 2017 (3)
  • April 2017 (1)
  • March 2017 (1)
  • February 2017 (1)
FOLLOW ME @INSTAGRAM

Created with by BeautyTemplates